こんにちは。ちゃぼP(@chabo0429)です。
さてさて、LAN内のDHCPやDNS、メールサーバと一通り揃ったのですが、VPNをどうしようかな、、と思っていた。何か、やりのことしたことを、面倒なことをいいことに後回しにしてモヤモヤした感じ。
モジュールも特にReadyNAS用に用意されていないし、SoftEtherではmakeしないといけないようなので、あえて避けていましたが、のどの奥に刺さった小骨のようになっていたので、ここは一念発起、やってみることにしました。
SoftEtherのインストール
L2TPレベルでVPNセッションを張ることができるので、同一のサブネット上にある他のPCやNAS、或いはIP電話機などにもアクセスでき、まるで家の中にいる感覚で使えます。
当然ながら、iPhoneやAndroidなどのスマホからもVPNを張れるので、ひかり電話を使っている場合は、外にいながら、家の電話の子機として使うこともできるという、アリバイ作りにはもってこいの仕様(おいおい)になっているのです。
まずは、ビルド環境を作ります。
# apt-get install build-essential
続いて公式サイトから安定版の最新バージョンをダウンロードしてインストールします。
CPUは「Intel x64 / AMD64 (64bit)」でいいでしょう。
betaと書いてあるものではなく、安定版の最新バージョンを使用します。
# cd /opt/

# wget http://jp.softether-download.com/files/softether/v4.08-9449-rtm-2014.06.08-tree/Linux/SoftEther%20VPN%20Server/64bit%20-%20Intel%20x64%20or%20AMD64/softether-vpnserver-v4.08-9449-rtm-2014.06.08-linux-x64-64bit.tar.gz

# tar -xzvf softether-vpnserver-v4.08-9449-rtm-2014.06.08-linux-x64-64bit.tar.gz
# cd vpnserver
# make
make すると規約とライセンスの確認プロンプトが出てくるので、それぞれYes/Agreeを選択します。
起動スクリプトの作成
次に、起動スクリプトを作ります。
# vi /etc/init.d/vpnserver

#!/bin/sh

# chkconfig: 2345 99 01
# description: SoftetherVPN 4.0

### BEGIN INIT INFO
# Provides:          vpnserver
# Required-Start:
# Required-Stop:
# X-Stop-After:
# Default-Start:     2 3 4 5
# Default-Stop:      0 1 6
# Short-Description: SoftetherVPN 4.0
# Description:
### END INIT INFO

DAEMON=/opt/vpnserver/vpnserver
LOCK=/var/lock/vpnserver

test -x $DAEMON || exit 0

case "$1" in
start)
$DAEMON start
touch $LOCK
;;
stop)
$DAEMON stop
rm $LOCK
;;
restart)
$DAEMON stop
sleep 3
$DAEMON start
;;
*)
echo "Usage: $0 {start|stop|restart}"
exit 1
esac

exit 0
次に、自動起動の設定です。
# chmod 755 /etc/init.d/vpnserver
# update-rc.d vpnserver defaults
# /etc/init.d/vpnserver start
VPNサーバの設定は、同じサイトからWindows版のVPN Serverをダウンロードすると、管理クライアントが付いているので、そちらをインストールしてから行います。その前準備として、サーバ側の初期パスワードを設定します。
# ./vpncmd

By using vpncmd program, the following can be achieved.

1. Management of VPN Server or VPN Bridge
2. Management of VPN Client
3. Use of VPN Tools (certificate creation and Network Traffic Speed Test Tool)

Select 1, 2 or 3: 1
ここは1でいいでしょう。
Specify the host name or IP address of the computer that the destination VPN Server or VPN Bridge is operating on.
By specifying according to the format 'host name:port number', you can also specify the port number.
(When the port number is unspecified, 443 is used.)
If nothing is input and the Enter key is pressed, the connection will be made to the port number 8888 of localhost (this computer).
Hostname of IP Address of Destination: 192.168.100.10:5555
デフォルトのポートは443ですが、ReadyNASは443はすでに使われているので、5555を選びました。
If connecting to the server by Virtual Hub Admin Mode, please input the Virtual Hub name.
If connecting by server admin mode, please press Enter without inputting anything.
Specify Virtual Hub Name:
ここは何も入力せずにEnter。
VPN Server>ServerPasswordSet
ServerPasswordSet command - Set VPN Server Administrator Password
Please enter the password. To cancel press the Ctrl+D key.

Password: *************
Confirm input: *************

The command completed successfully.

VPN Server>exit
これでパスワードが設定されました。
管理クライアントでの設定
続いて、管理クライアントの操作に移ります。
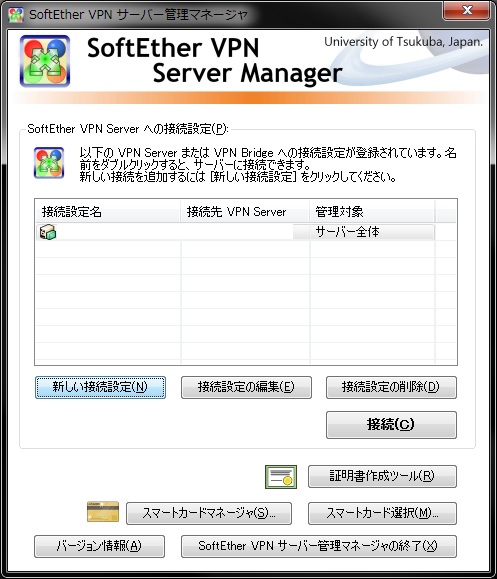
新しい接続設定を選択。
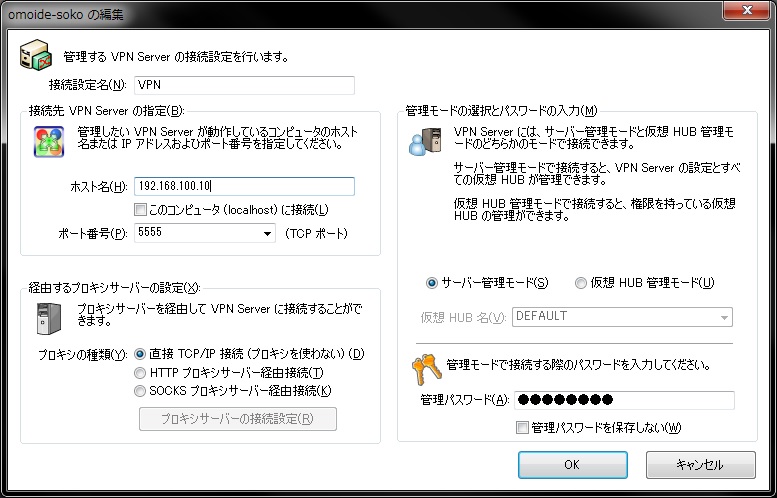
サーバのアドレス、ポートと先ほど設定した管理パスワードを設定。
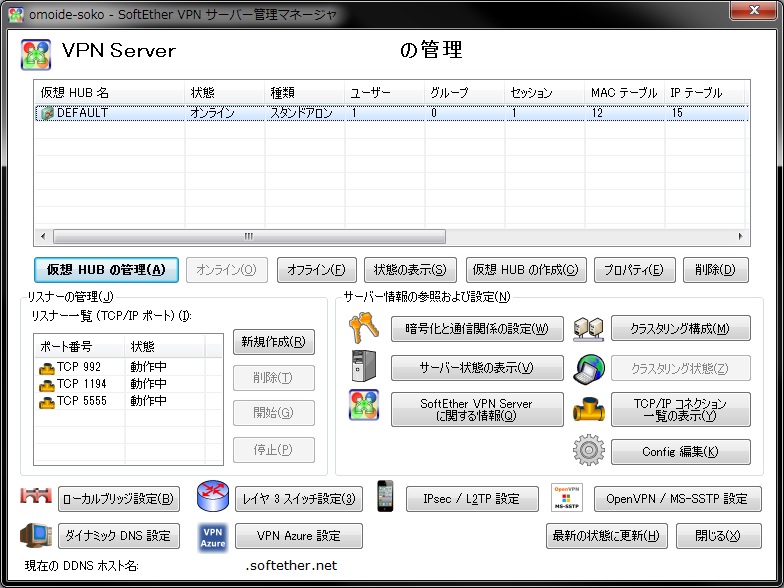
サーバに接続します。

仮想HUBの管理でユーザーを作ります。

続いて、L2TPを有効化し、事前共有キーを設定します。

最後にローカルブリッジを物理LANポートに設定すればOKです。今回、ReadyNASはチーミングを組んでますので、「bond0」が物理ポートになります。
[amazonjs asin=”B00CHABQRW” locale=”JP” title=”NETGEAR ReadyNAS 102 2ベイ Diskless 3年保証 ネットワークストレージ 個人/SOHO RN10200-100AJS”]


